Friday, January 2, 2015

Window Puns are so Transparent

Oh hey, loyal readers! I'm going to try super hard to post more than twice this year. Pinky swear.

The last several posts have been about the front yard, so I'm sure you're sick of looking at it. Let's talk about putting big old holes in the house, shall we? 


Even though I've failed to write about it once, we've managed to replace all of our windows! We did leave the windows in one room untouched. We plan to eventually put a sliding glass door in there, so there didn't seem to be much point in paying for windows that will only be in place for a few years. We plan to even more eventually make that room into a sort of bottom landing space for stairs to the super eventual upstairs. I digress. 

We replaced a total of 10 windows. We chose Milgard brand vinyl windows. They are not the fanciest or most expensive windows by a long shot, but we think they look pretty decent. They open and close, which is a novelty for us. They are double-glazed with argon and they have a low-e coating. Basically that means that you don't feel an actual draft standing near them. Winning!

We opted for new-construction type windows instead of replacement windows. They're more work, but we didn't have much faith in the existing frames. 

I felt pretty fancy when my window drawings were approved by the city! They probably would have been fine with a napkin sketch, but let me have my moment, okay? 


We started with the teensy tiny window in the entryway. We were able to master our technique without having to wrestle with big heavy windows. 

We became pretty handy with a pry bar as we removed all of the interior and exterior wood trim. The small window was easy to remove, but the big wood ones were pretty heavy. Our window-removing savior was what my family calls a go-to-hell tool. It's actually called an oscillating tool and you should buy one. Go on, you know you want to. We have a Bosch and have been happy with it, but there are many available. 


Anyway, here's the rough opening. The siding was in many cases super close to the opening.  


We wouldn't have had room for the window flange, so we nailed 5/4 blocking all the way around. We used some pre-primed lumber because 5/4 was hard to find and this was the best we could do. The window opening needs to be square and level, and you need the correct gap between the window and the opening. We were able to shim behind the 5/4 lumber to adjust the wonky openings.   


Next up we flashed the windows with Fortiflash. I'm going to decline to show detailed pictures of this because our method is so... unorthodox? Um, wrong? It was the best we could do given the situation, but I would never recommend it. Given that I sort of do this for a living, I'd rather not lead anyone astray! 

In any case, here's a window with the flashing in place. Don't try this at home. 


Putting the window itself in is basically the easy part, except that you've stupidly just covered it in sealant. Stick your hand in the sealant and you'll feel sticky for days. We learned some importance lessons about disposable gloves on this first window. We also learned some lessons about not putting windows in upside down. Oops!


Here's the before/during/after of our first window. The real after is still pending, because it still looks just exactly this ugly. 


Window trim is tip top on the 2015 to-do list. 

And now, because I have about a thousand window pictures, I shall make you look at more of them. 

Here's the bedroom - the window on the right is an aluminum replacement window of unknown vintage. Maybe 1970's based on the classy fake wood sticker on the handle. On the left is a new window. We used casement windows in the bedroom so that we're in compliance with current egress codes (these generally cover sill height and opening size). 


A few of the windows had a small sheet metal head flashing. When we pulled it down, we discovered it was installed by some very thrifty soul reusing some kind of insect killer container. 


We posted this photo on Craigslist and actually gave away many of the window bits. They're no good for installing in a house, but these folks seemed to have some crafty plans. 


The bathroom window replacement brought up an unfortunate tile situation. A trough between the tile and the window is undesirable to say the least. The tile is in rough shape anyway, so this just changes our timeline for replacing it. We're having a bit of a debate as to whether or not we can retile the shower ourselves. Feel free to weigh in! 


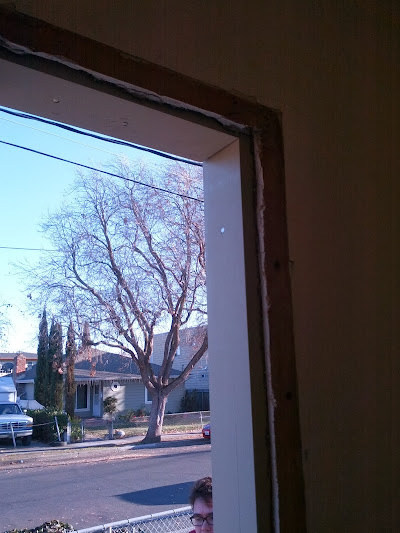
Here are the new front living room windows. This is the fix for the big hole Devon is standing in in the first picture above. 


Google very helpfully auto-awesomed one of my photos of the kitchen window replacement. It's like we live in a dreamy Mediterranean villa! I'd like my money back, though, because there's a big hole in my freaking villa. 


So that's that! We've lost momentum on actually ordering and installing the trim, but we did design it and make detailed cut lists and material lists. If the window trim ever happens, we'll tell you about it here on Over Do-It-Yourself! 

Monday, August 4, 2014

Pet Rocks

The weird bit of dirt to the left of the driveway has been neglected even longer than the rest of the front yard.

It looked like this when we moved in:


Then it pretty much looked like that for two years, give or take some black plastic that never did kill the weeds like the internet promised. We've had a long standing plan to fill the area with some nice looking rocks, build a wood walkway to extend the driveway surface, and maybe plant some fountain grass.

We were renting a truck to take window waste to the dump, so we took the opportunity to get the rocks. We discovered that landscape rocks can be crazy expensive. We found some we liked then realized that they're $620 a ton. And we needed at least 1.5 tons. Uh, what?


So we decided to learn to like the MUCH cheaper ones.
Getting a lot of rocks into a truck at a landscape place is a piece of cake. You park on the scales and they dump the rocks in the truck. Getting them out is harder, to put it mildly.

Here's the truck with about a half ton of rocks, so 1/3 of the total. We removed them from the truck a shovel full at a time. It didn't take as long as I feared, but it did hurt for several days following.


But, bright side! We now have lovely and intentional looking rocks instead of dirt and weeds.


The wood walkway and potential plants will just have to wait, along with every other project!

Sunday, August 3, 2014

Greener pastures

Oh hey there, first post of 2014! We've been a little discouraged by our slow progress on many projects. We still ponder and plan about house projects constantly, but it's been hard to actually finish any of our schemes. We have accomplished a few things, though, so I'll attempt a series of catch-up posts.

First of all, I was looking through the last couple of old posts and realized that when we left off, the front yard looked like this:


It looks significantly better now!


Right now it's unmown. It looks kind of nice and meadowy like that, but it tends to try to escape, so we do have to mow it every now and then.

We did one little project that you currently can't see because the grass is so tall and has grown so aggressively.

We wanted a border between the yard and the flower bed areas, but we don't really like most of the Home Depot-available landscape borders. We went to our awesome local landscape supply yard and scored some authentic San Francisco cobbles. Well... it says they're San Francisco cobbles, but perhaps they were hoping for gullible buyers just like us. In any case, they're nice looking squarish stones, so we threw a bunch into our long suffering car.


Here they are in place. The grass wasn't as aggressive at that point, so they looked pretty nice.


Here's a similar view today. That ridge in the grass is the spot where it's overtaking the stone border. I'm planning to learn to use the weed eater so I can cut the grass back from the border and back off of the sidewalk. But really, in what universe is learning to weed eat a particularly high priority?

The rosemary and lavender are going crazy, and the canna lilies are the tallest we've seen. Apparently they thrive on a diet of crappy soil and mild neglect.


Our succulent project is coming along well, too. Every now and then we divide the plants that are doing really well and replace ones that have died. For the most part, they seem very happy. We had lots of cool flowers this year, though I didn't manage to get photos of any.


Sunday, December 8, 2013

A Garden to Grow Into


Remember my irrational hatred of geraniums? I can't explain that, but I am pleased to report that they're gone!

Before - awful geraniums, including the pink one that was mutated by the termite-killing chemicals

After - blissful empty space! The window canopy is folded down because Devon was adjusting the new antenna. 

Ripping out the geraniums finally prompted us to redo that part of the flower bed. Our long-standing plan was to make some cool concrete planters of varying heights and sizes and fill them with succulents. We made one sort of half-hearted attempt to build one of these planters, but we messed it up then lost interest in the project. I had a brainstorm one day and realized that these Turfstone pavers might do the job pretty well:


We had quite an adventure trying to buy them. At Lowe's, the sign said there was no minimum, but the employees all said that must be a mistake - you had to order a whole pallet. We tried the landscape supply place very close to our house, but they also said that we had to order a pallet. Then, on my way home from work sick, I thought I'd make a quick stop at a place that theoretically could order a small number for us. They said we could pick them up at yet another location, so I spent the rest of my sick day picking up Devon, picking up the stones, and heading home. Worst sick day ever. 

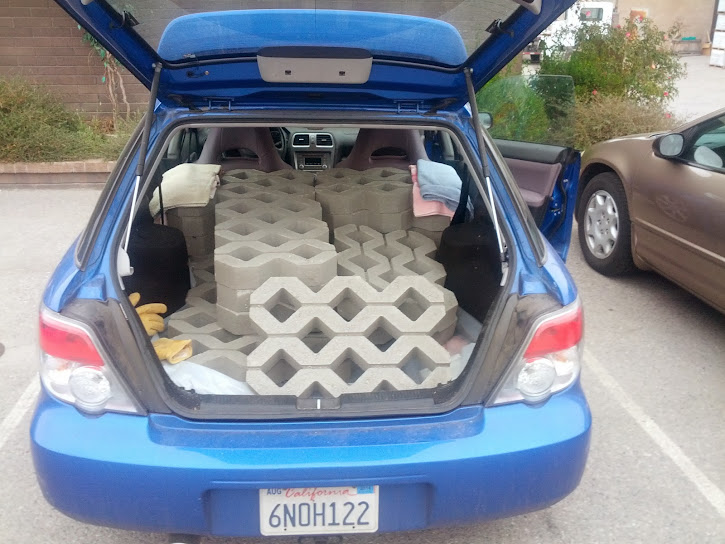
Anyway, 16 pavers x ~35lb each = 560lbs in our little car:


It was sitting a bit low...


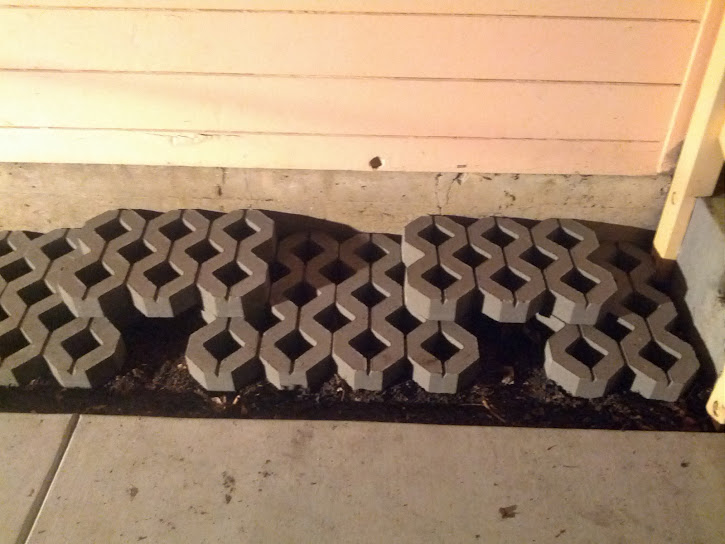
A few days later, we started placing the stones. We placed them like this (working with a work light even thought it was only about 5:30pm):


Then filled them with a mixture of soil and sand:


Then in actual daylight, we split up and planted all of the succulents we've been collecting for a year:


They need to grow into their new homes, but we think they're going to look pretty nice eventually!


Sunday, August 18, 2013

Weeds

Today I finally did some painting in the garage. (More on that later.) Before cleaning all the paint off my arms and legs and hair (I have bad aim), I decided to spend a couple of minutes pulling the most obnoxious of the weeds in the front yard.

... an hour later:


I'm not even sure these photos do the size of the weed pile justice. It was huge. 

There's now some competition for my least favorite kind of weed. It used to be an easy pick - these nasty thistly-looking ones that break off in your hand when you try to pull them. Jerks. Today I discovered some other really nasty ones, though. They look sort of innocent and grassy, but they have lots of very fine, far-reaching roots, so when you pull them, a huge clod of dirt comes up with them. Do not want. 


Sunday, August 11, 2013

The Grass is Always Greener in Somebody Else's Yard

So, the front yard. We're not really into the golf-course perfect lawn thing (good thing, as you'll see below), but we couldn't decide on much else to do with our small front yard besides plant grass. So over many (too many) months, we've been slowly transforming an oddly orderly group of bushes into something that resembles a yard. Sorta. This is the long-overdue post of our attempt. 

It used to look like this:


That's two million of the same purple bush. They really liked it here, so they got really overgrown. We finally decided we were sick of looking at them. Mature bushes like this would cost some actual money at a nursery, so we thought we were being rather generous when we posted on Craigslist and Freecycle that the plants were free to anyone who would come dig them up.

Oy. Nobody showed up when they said they would. Everybody wanted to tell you their life story related to why they didn't just show up when they said they would. People said they were too hard to dig up. People (repeatedly) asked us to dig them up for them. No. 

I think we successfully gave away 4 out of 12. The rest we dug up ourselves and put in the compost bin a couple a week. 

So, clean slate! Weedy slate, but clean slate. 


We decided to avoid dumping a truckload of round up on the yard, and we attempted a greener and uglier method weed killing. We got a couple of rolls of black plastic and hauled out some of the random paving stones we've found around the place. We left this lovely installation in place for a few weeks. 


When we pulled up the plastic, everything was dead. Hooray! Off we went to Home Depot to rent a tiller. After we out-smarted that pesky switch that opens the fuel line, we tilled away. 


Then, because even fancy grass needs water, we installed an irrigation system. Our knowledge of irrigation is pretty much like our knowledge of any of this other house nonsense - we read about it on the internet. Well, Devon read about it on the internet. I helped, because I really love PVC cement. Also, I love those handy ratcheting PVC scissors. (They're probably not actually called scissors.)

I am useful in the autocad stage of each project! Here's our diagram of where we needed to install sprinkler heads to cover the space. 


Digging trenches is no fun, but luckily the yard is small. Here is it tilled and trenched.  


We test-fit the whole system, and I think we only had to go to the hardware store once for additional T's and elbows and such. That's practically miraculous! Here's one of the sprinkler head locations.


The water connection is by the house, across the sidewalk from the yard. Devon found this handy nozzle thinger that you're supposed to use to drill under sidewalks. You attached it to a length of PVC and attach an adapter and garden hose to the other end. It's supposed to spray a strong enough jet of water that with a little muscle you can push the pipe under a sidewalk.


Seems like it should work, no? Yeah, it doesn't. At least, it doesn't work when your soil has so much clay that you could make pottery. One more trip to the hardware store, this time for a steel pipe and a sledge hammer. Here's Devon employing the improved brute force sidewalk drilling technique.


 Once we were through to the other side, we needed to hook the system up to the water supply. I happily cut and glued connectors and such for the pump:


And Devon was in charge of teflon-taping our new and improved hose and sprinkler valves:


Here's the whole mess assembled. The stub to the right is for a future additional irrigation zone to serve the landscaping. Eventually those geraniums will go away (I despise geraniums) and maybe we'll plant something to disguise this set-up a little.


  We cemented the whole system together. Doesn't it almost look like we knew what we were doing?


 We put the heads on and look! Water!


Fast forward to the next weekend - time to plant the grass. We ordered Buffalo Grass, which looks pretty and is fairly drought tolerant once established. You can't just spread seeds, though - you have to plant these little plugs 12"-18" on center. Here are two of the trays. We used three for the whole yard.


And here's the yard all planted! It was a pain, but we were once again glad that the space isn't that big. I got a horrible lower-back sunburn from leaning over for hours. You just don't think to put sunscreen there...

We also planted our lemon tree, which has lived in a big pot for a couple of years now.


 The fruits of our labor - brand new grass being watered!


Here's the yard about one month later. The grass is growing well... just not as well as the weeds.  This is when we realized that we should have actually followed the nursery's instructions for preparing the soil.


We read about what kinds of weed-killers are safe for buffalo grass, and here's the yard as of yesterday. The dead things are weeds! So, it's not beautiful yet, but we're getting there.


And now for something prettier, here are some photos of our other flowers and plants.