
The last several posts have been about the front yard, so I'm sure you're sick of looking at it. Let's talk about putting big old holes in the house, shall we?

Even though I've failed to write about it once, we've managed to replace all of our windows! We did leave the windows in one room untouched. We plan to eventually put a sliding glass door in there, so there didn't seem to be much point in paying for windows that will only be in place for a few years. We plan to even more eventually make that room into a sort of bottom landing space for stairs to the super eventual upstairs. I digress.
We replaced a total of 10 windows. We chose Milgard brand vinyl windows. They are not the fanciest or most expensive windows by a long shot, but we think they look pretty decent. They open and close, which is a novelty for us. They are double-glazed with argon and they have a low-e coating. Basically that means that you don't feel an actual draft standing near them. Winning!
We opted for new-construction type windows instead of replacement windows. They're more work, but we didn't have much faith in the existing frames.
I felt pretty fancy when my window drawings were approved by the city! They probably would have been fine with a napkin sketch, but let me have my moment, okay?

We started with the teensy tiny window in the entryway. We were able to master our technique without having to wrestle with big heavy windows.
We became pretty handy with a pry bar as we removed all of the interior and exterior wood trim. The small window was easy to remove, but the big wood ones were pretty heavy. Our window-removing savior was what my family calls a go-to-hell tool. It's actually called an oscillating tool and you should buy one. Go on, you know you want to. We have a Bosch and have been happy with it, but there are many available.

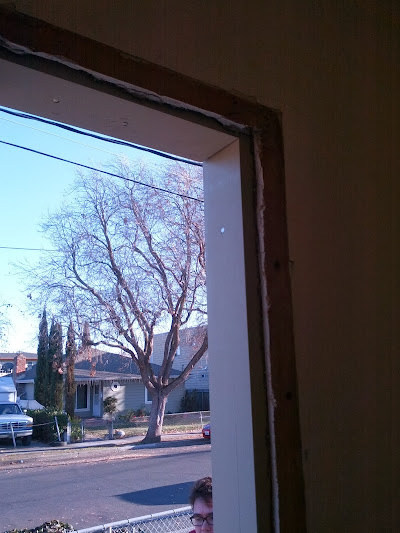
Anyway, here's the rough opening. The siding was in many cases super close to the opening.

We wouldn't have had room for the window flange, so we nailed 5/4 blocking all the way around. We used some pre-primed lumber because 5/4 was hard to find and this was the best we could do. The window opening needs to be square and level, and you need the correct gap between the window and the opening. We were able to shim behind the 5/4 lumber to adjust the wonky openings.
Next up we flashed the windows with Fortiflash. I'm going to decline to show detailed pictures of this because our method is so... unorthodox? Um, wrong? It was the best we could do given the situation, but I would never recommend it. Given that I sort of do this for a living, I'd rather not lead anyone astray!
In any case, here's a window with the flashing in place. Don't try this at home.

Putting the window itself in is basically the easy part, except that you've stupidly just covered it in sealant. Stick your hand in the sealant and you'll feel sticky for days. We learned some importance lessons about disposable gloves on this first window. We also learned some lessons about not putting windows in upside down. Oops!

Here's the before/during/after of our first window. The real after is still pending, because it still looks just exactly this ugly.

Window trim is tip top on the 2015 to-do list.
And now, because I have about a thousand window pictures, I shall make you look at more of them.
Here's the bedroom - the window on the right is an aluminum replacement window of unknown vintage. Maybe 1970's based on the classy fake wood sticker on the handle. On the left is a new window. We used casement windows in the bedroom so that we're in compliance with current egress codes (these generally cover sill height and opening size).

A few of the windows had a small sheet metal head flashing. When we pulled it down, we discovered it was installed by some very thrifty soul reusing some kind of insect killer container.

We posted this photo on Craigslist and actually gave away many of the window bits. They're no good for installing in a house, but these folks seemed to have some crafty plans.

The bathroom window replacement brought up an unfortunate tile situation. A trough between the tile and the window is undesirable to say the least. The tile is in rough shape anyway, so this just changes our timeline for replacing it. We're having a bit of a debate as to whether or not we can retile the shower ourselves. Feel free to weigh in!

Here are the new front living room windows. This is the fix for the big hole Devon is standing in in the first picture above.

Google very helpfully auto-awesomed one of my photos of the kitchen window replacement. It's like we live in a dreamy Mediterranean villa! I'd like my money back, though, because there's a big hole in my freaking villa.

So that's that! We've lost momentum on actually ordering and installing the trim, but we did design it and make detailed cut lists and material lists. If the window trim ever happens, we'll tell you about it here on Over Do-It-Yourself!