Saturday, June 30, 2012

Bunnyproofing

Last week we finished a project that will help with (eventually!) letting the bunnies have the run of the place. They're super excited, naturally.

First, to back up a bit - when we set up our apartment in Mountain View, we wanted to organize the cords behind the tv. Partly to keep them away from nibbly bunnies, partly just so they wouldn't be a total mess. I devised a system of velcro strips to attach all of the cords and chargers to the back of the tv stand. At the time, I thought I was pretty clever, but the system didn't hold up well. The first time we had to move something, it was a mess again.

The old cable management attempt
Before we tackled the cord situation this time around, I repainted the red insides of the cabinet. I spray-painted it last time, and the surface was always rough. It attracted bunny fur and was then a pain to dust. It was pretty much just dusty all the time as a result. 


That little roller is the BEST THING. I love it more than any person should love a flimsy plastic tray. And it was $1.97. Be still my beating heart. 

Anyway.... once the tv stand had its legs repaired after some slight damage in the move and its insides repainted, we implemented Devon's really clever idea for managing cord/rabbit relations. 

First, we painted some 1x4's with my favoritest toy:


Then we attached them to the back of the tv stand:

Then we shoved the whole thing against the wall:

And ta-da! A little cubby for all of the cords and chargers and nonsense to live. I don't even feel like we have all that many electronic gizmos on the tv stand, but they certainly generate a big pile of cables. 


The idea behind painting the wood was that it would look like we did this whole thing on purpose. Since real wood will never look like Ikea laminate, we went with the red.


I haven't gotten around to taking a picture of the whole set-up truly finished, but you get the idea. The best part is that there's nothing at all on the floor. Except dust...


Friday, June 15, 2012

Small Victories

You've missed so much! We moved! And the house is termite-less! (Or full of dead termites?) And we broke the toilet! Twice!

One step at a time, though. After the circus left town (that is, the fumigation tent came off), we started moving carloads of things every time we stopped by the house for some other reason. Usually the reason was that we didn't want to be at the apartment packing...

Somehow we did finish the packing in time for the move last Saturday, though. Mid-packing, the apartment looked something like this:


It was a disaster. Now, the house looks like a disaster! Hooray!


To be honest, it mostly still looks like that. I started a new job this week and we've had service appointments for the gas, internet, and termites to deal with. We're both learning new commutes and trying to figure out how to make dinner with no refrigerator. In general, time to unpack has been hard to come by. 

We have managed some small victories, though! The day before we moved in, we realized the kitchen sink was well and truly clogged. Devon tried plunging it with one of the plungers that the house happened to have. No luck. We went to the store and bought a good plunger and a snake, and were thrilled to later return the snake. The good plunger did the trick and we were relieved that we could, you know, use the sink once we moved in. 

Another small victory was that we managed to spend zero nights on the air mattress. We had an awesome crew to help us move and it really only took a few hours. After the move, we made setting up the bed a priority so that we would have a comfy place to sleep after a long day. 

We did one small project this week amongst the boring errands and such that managed to occupy most nights. As part of the larger bathroom project, I installed a fancy new shower rod. No pictures until I show you the rest of the bathroom, but I do have some gross pictures of the old rod!


As you can see, the curtain rod is attached to the wall with a layer of structural paint and force of habit. It took a surprising amount of effort to get it down! As with lots of projects around here, this one kind of made me feel like an archaeologist. I found all sorts of fun paint colors, including the one the rod was installed on top of:


It's kind of a creepy skin tone. Eww. Those spots are still there, since we're going to tackle all of the bathroom drywall repairs at once. One of these days. 

This all brings me roughly to the present. Right now the toilet is possibly broken and the flex hose is definitely leaking. Luckily, there's a new toilet waiting in the garage. More on that exciting topic next time!


Wednesday, June 6, 2012

The circus is in town!

Yesterday the termite fumigation was started on the house. Boo termites! Hooray for a house full of chemicals!

I was inside cleaning up grout when the guys started covering the house. No worries, they knew I was in there!


Here are the workers clamping pieces of tarp together. 


Those are some giant canisters of gas. They spray in tear gas first as a warning, then spray in the good stuff.


They worked very hard to leave the really tragic diseased bush outside of the tarp, but the geraniums are inside. Oh well, they were looking sad and I don't actually like geraniums much...


Here's our little house almost ready for fumigation. I didn't stay until they finished because watching a house being covered in a tarp is only entertaining up to a point.


The house will be uncovered tomorrow and we're allowed back in in the evening. Packing is coming along and we're excited to start the process of getting settled!

Tuesday, June 5, 2012

Oh, I'll just touch up a few spots in the grout...

I decided I'd go over to the house on Monday and touch up a few spots in the bathroom and kitchen where grout was noticeably missing. As soon as I bothered to look at the grout closely, I quickly decided that a full regrout was in order. Time to over-DIY it!

I had this really enthusiastic guy teach me how to regrout. Looks easy enough, huh? I gathered all the supplies at Home Depot - a grout saw, some sort of trowel, a grout float, pre-mixed sanded grout, and a grout sponge. The grand total was $35, which I now think was more than reasonable for the difference it's made.

Now I shall show you horrifying 'before' pictures. Prepare to be horrified.

The bathroom floor, right by the door
bathroom floor, entirely too close-up

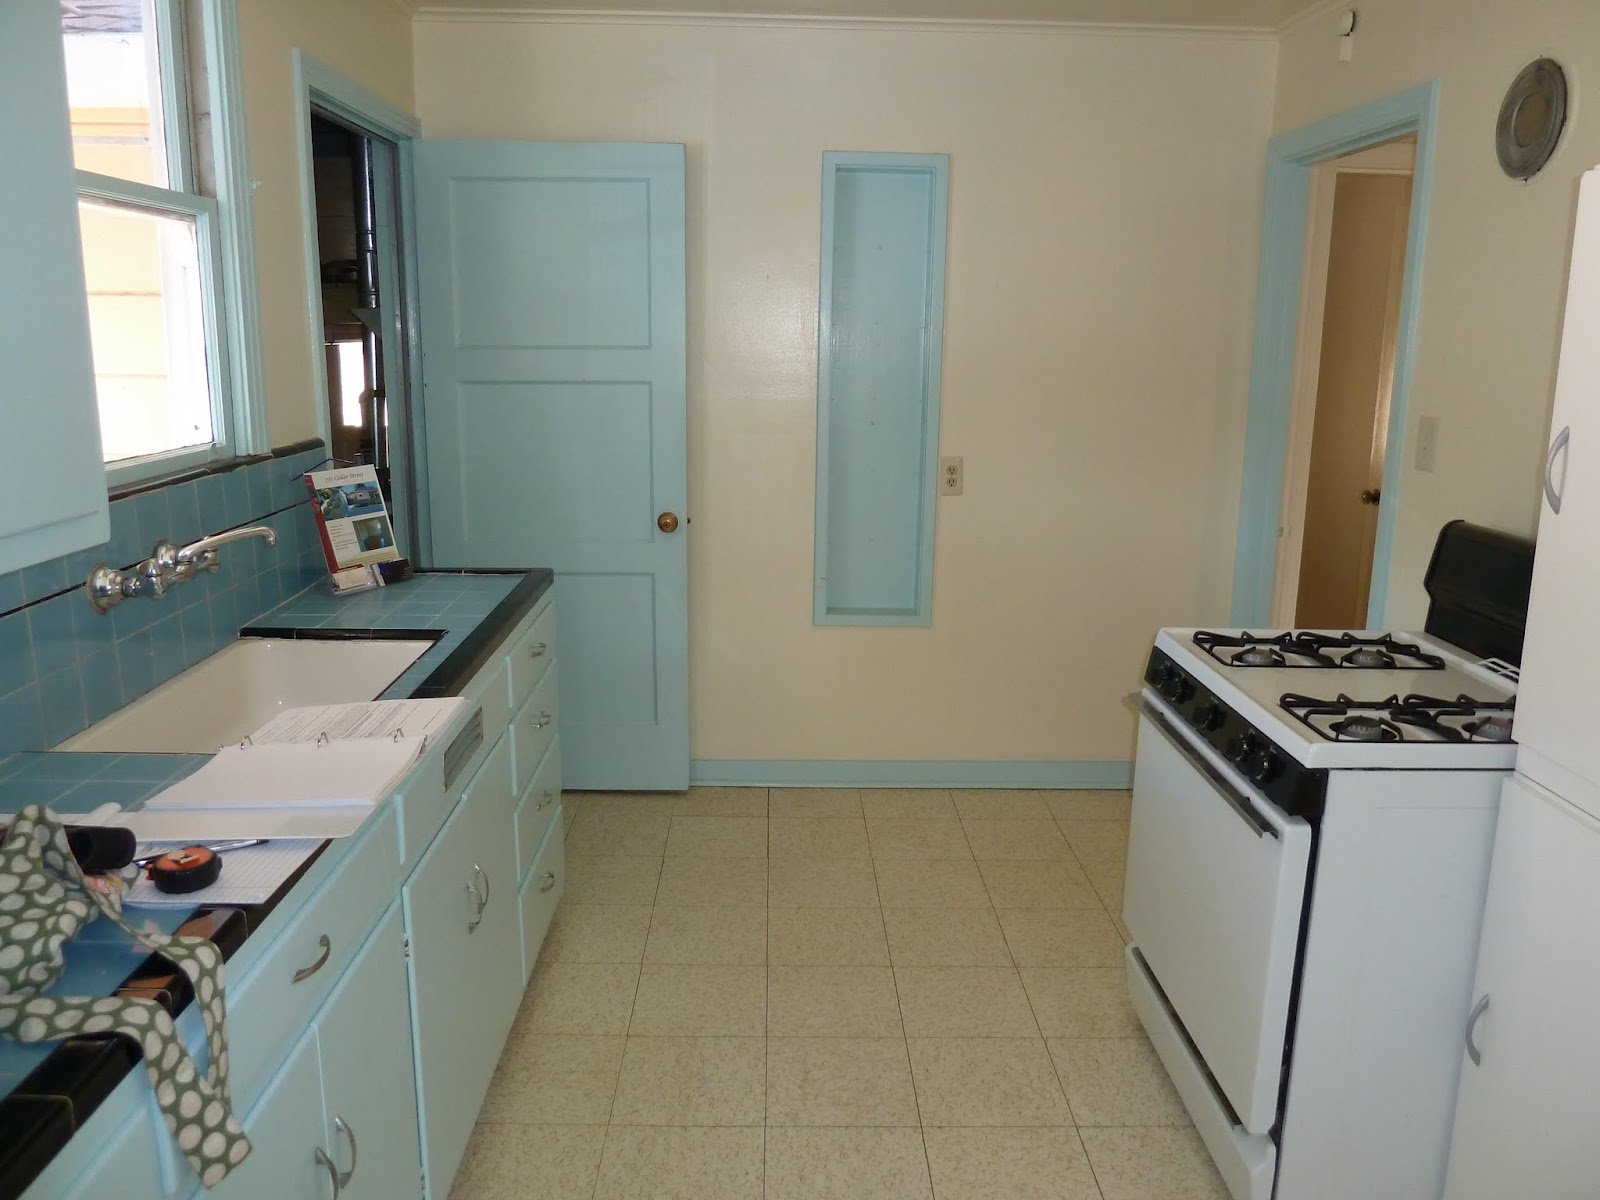
kitchen counter, the good part!

Kitchen counter right by the sink. Gross. 

I apologize for those nasty pictures. I'm sure you've done nothing to deserve to see such things. Anyway, as you can see, the grout was at worst missing and replaced with filth and at best quite stained.

I broke out my trust grout saw and started to work. By "trusty", I mean the very cheapest one in existence.


It worked pretty well, though, and in an hour I had scraped all of the grout on the bathroom floor. I vacuumed up the grout bits and began to attempt to actually apply new grout. I have very little idea of whether or not I did it correctly, but it mostly seemed to work. I suspect I smeared grout around with my hands more than is actually necessary. 


That's the grout float, used to schmear the grout around haphazardly. At least, that's how I used it. We decided we're getting a new toilet, so I didn't worry too much about getting grout on this one. I hope I don't have too much touch-up to do after we install the new one.

After I smeared grout around enough to suit, I raked up as much as I could then wiped everything down with a damp sponge. The sponging was a little tricky, I must admit. If you apply too much grout at once, it starts to dry and is harder to wipe off. If the sponge is too wet, you make a mess and dilute all of the grout you just carefully applied. Also, there's a lot of sand in sanded grout - go figure. I washed a fair amount down the bathroom sink. I'll let you know when that comes back to haunt me.

Here's the status of the floor after grouting and sponging.


It's so much better even with a haze of grout covering everything!

After I finished the floor, I headed home, made a lasagna, and we got some shiny new phones. Yay! After dinner we pried ourselves away from said shiny phones long enough to scrape and grout the flat surface of the kitchen counter.


And here's the especially gross spot by the sink:


It's not a black hole for rotten food anymore!

Okay, fast forward to this afternoon. I went over to the house and started on the clean-up effort. Apparently I was supposed to wipe the grout off 2 hours after applying it, but I didn't read the directions.

I started with the end of the kitchen counter. The grout film was quite stubborn. I dumped on some vinegar and broke out the scrub brush. Progress! But... also, removal of the new grout from the seams. Oops. It's not too bad, but I will need to touch it up.


I started to notice grout filling in score marks, pits, and other imperfections in the tile. I guess that's just the way it's going to be with old tile. After undoing some of our work in the kitchen, I thought I'd move to the bathroom. The grout there had had a few more hours to set up, and I left the vinegar and scrub brush behind. 


Much better! I made good progress with just water and the scrubby mesh side of a dish cloth. I finished nearly half of the room today, and I'm thrilled with the results. It's starting to look like civilized people could bathe here! 


While I was scrubbing, I was looking really close and noticing spots that were still a tiny bit discolored. Then I came home, looked at the before pictures, and immediately felt amazing. It might not be perfect, but it's such a HUGE difference! 

The grouting adventure is not quite finished. I need to clean the rest of the bathroom floor, repair then clean the kitchen counter, then scrape, grout, and clean the kitchen back splash and the shower surround. 

And now, for dramatic effect, and to make me feel better, a before and after:


Hopefully this picture will provide motivation for the rest of the project!

Sunday, June 3, 2012

New locks

Today after picking up stuff for the bathroom renovation and learning all about toilets at Home Depot, we tackled our first project at the house.

We actually have no clue how much having locks re-keyed costs, but given the condition of the locks, we decided that installing new ones would be our best bet. Plus, why hire a professional when we can hack it together ourselves?

Here's what we started with this afternoon.


Is that scotch tape on the knob? I don't even know.

The first adventure was figuring out how on earth buying new locks works. We decided on Schlage because it was a brand name we knew but it wasn't the insanely expensive brand. We knew we wanted a keyed knob and a deadbolt for the front, plus a keyed knob for the back. The packages have 6-digit codes printed on them, and they helpfully suggest that if you want locks that are keyed the same, you match the codes. I think that system might just be designed to frustrate though, because if you get the knob-and-deadbolt value pack, the codes will absolutely not match any of the single knob codes. No way, no how.

After a long wait in line, we discovered that Home Depot can in fact re-key a lock for $5.00. We decided that was totally worth it and waited while they switched the single knob to match the value pack.

Already feeling pretty confident in our mad lock-purchasing skills, we tackled the front door first. The above picture is of course the outside view. Here's the inside, which was only a little better.


We forged ahead with little thought to reading the instructions. After scraping out the hole in the door a little to fit the deadbolt, we attempted to assemble the lock. Apparently it matters if the deadbolt is extended while you do this, and the rotation of the thinger on the outside part matters. So we did it a couple more times until it seemed to actually operate like a lock. Success!

On to the strike plate. It probably took 20 minutes and a dozen or so swear words to remove the old one. Those were some seriously monster screws, man. Devon dremeled (that's a verb, right?) the door jam so that we could sink the new strike plate in nicely.


After driving in our own seriously monster screws, we discovered that the door would both close properly AND lock. We're good.

The knob was much easier to install, though when we attempted to screw the strike plate to the door we were greeted with a black hole of crappy wood and old screw holes. I mentioned that we thought this was a single-owner house. Now we're not so sure, because the locks have clearly been changed a BUNCH of times.

Giant screws seemed to do the trick on the strike plate, though, and after finishing the knob installation the door would still close and lock! Amazing!

Here's the result of our work.


Hopefully nobody will look at the door jam for too long. It's totally sturdy and functional, but it looks like a mess.


At the edge of the new deadbolt, you can see at least two previous paint colors - bright yellow and hospital green.


Someday we'll repaint the door. Maybe.

After finishing the front door, the back door was a breeze. I forgot to take 'before' photos, but you can just use your imagination. The knob was yucky and there was a random bit of wood nailed to the door jam. Now it's all better!


If you read this entire post about locks, I commend your dedication. I hope for your sake that we find more exciting projects or that I get bored with blogging sooner rather than later!

Welcome!

If it's worth doing, it's worth over-doing, right? That seems to be our motto around here anyway, so we (well, I) decided to blog about our misadventures in DIY-ing. Said misadventures will be even easier to come by than usual now that we are proud home owners!

The blog will be devoted to house stuff in the short term, but eventually we plan to feature our over-DIYing in all it's forms - including but not limited to knitting, sewing, brewing, canning, and soap making.

For now I'll introduce you to our new little house.


Isn't it cute, in all it's salmon-colored glory? It was built in 1947 and we hypothesize that it was a single-owner house. We might be changing our minds about that, but I'll get to that in the next post.


Here's the entryway. The funny doorways are one of the best parts!


And on to the living room. Gah, I love the floors. Not a lot has been done to the house recently, but the seller did refinish the floors. It's nice to not have to worry about that right away.


Speaking of floors, check out the corners. So cool!


Okay, moving on - the dining room. It makes me feel like such a grown up to have a dining room.


And the kitchen. The kitchen will be requiring some love. As in, it needs a new one. That project will have to wait, but we're already scheming. The floors don't photograph well, but trust me when I tell you that they prominently feature gold sparkles. I'm sure they were super trendy at some point!


Next up, the bedrooms. One is a little bigger and one a little smaller.


Alright, you've seen some nice white rooms with pretty wood floors and you've hopefully had time to prepare for this:


Oh my. Words cannot fully express my loathing for this vanity. Just perfectly hideous.

My favorite part might be how it clashes with the blue tile in the rest of the room. Actually, my very favorite part about the vanity area is that the mirror hits the wall and doesn't open all the way. I mean, really. 


Okay, okay, moving on. Another funny feature in our house is the overabundance of doors. You could completely close yourself in the hallway, but I'm fuzzy on why that's a good or useful thing.


Next on the tour, our charming garage.


The flag, boxes of old income taxes, and rickety ladder our now ours. Hooray? The garage loft is a great feature, though the "beams" across the garage are confusing at best.


Moving on to the great outdoors! We like to think the key word back here is "potential." Doesn't it just have TONS of potential?


It does have one thing we super love - an orange tree!


It seems to more or less be thriving on a diet of neglect, so I'm pretty sure we can even keep it alive. The oranges are delicious, too. We also have a slightly sad but very useful shed.


Here's a quick plan of the house. Some day I might even add the windows.


So there you have it, our new and never-ending project! We have lots planned, so check back every so often to see what we're up to.