Sunday, December 8, 2013

A Garden to Grow Into


Remember my irrational hatred of geraniums? I can't explain that, but I am pleased to report that they're gone!

Before - awful geraniums, including the pink one that was mutated by the termite-killing chemicals

After - blissful empty space! The window canopy is folded down because Devon was adjusting the new antenna. 

Ripping out the geraniums finally prompted us to redo that part of the flower bed. Our long-standing plan was to make some cool concrete planters of varying heights and sizes and fill them with succulents. We made one sort of half-hearted attempt to build one of these planters, but we messed it up then lost interest in the project. I had a brainstorm one day and realized that these Turfstone pavers might do the job pretty well:


We had quite an adventure trying to buy them. At Lowe's, the sign said there was no minimum, but the employees all said that must be a mistake - you had to order a whole pallet. We tried the landscape supply place very close to our house, but they also said that we had to order a pallet. Then, on my way home from work sick, I thought I'd make a quick stop at a place that theoretically could order a small number for us. They said we could pick them up at yet another location, so I spent the rest of my sick day picking up Devon, picking up the stones, and heading home. Worst sick day ever. 

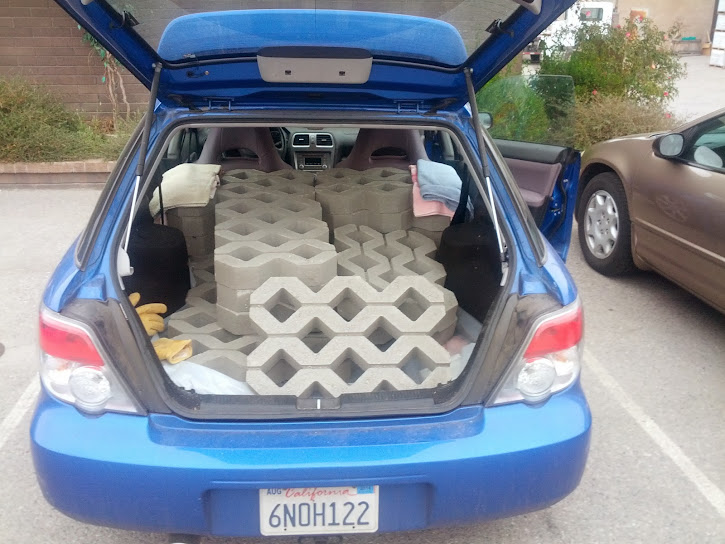
Anyway, 16 pavers x ~35lb each = 560lbs in our little car:


It was sitting a bit low...


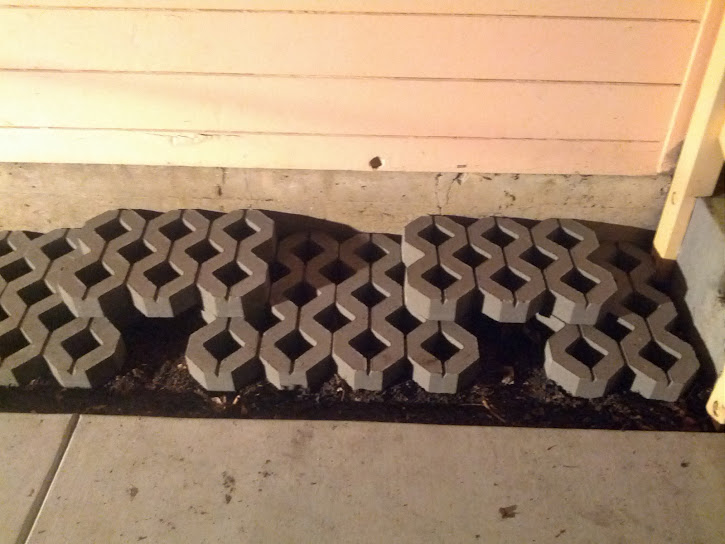
A few days later, we started placing the stones. We placed them like this (working with a work light even thought it was only about 5:30pm):


Then filled them with a mixture of soil and sand:


Then in actual daylight, we split up and planted all of the succulents we've been collecting for a year:


They need to grow into their new homes, but we think they're going to look pretty nice eventually!


Sunday, August 18, 2013

Weeds

Today I finally did some painting in the garage. (More on that later.) Before cleaning all the paint off my arms and legs and hair (I have bad aim), I decided to spend a couple of minutes pulling the most obnoxious of the weeds in the front yard.

... an hour later:


I'm not even sure these photos do the size of the weed pile justice. It was huge. 

There's now some competition for my least favorite kind of weed. It used to be an easy pick - these nasty thistly-looking ones that break off in your hand when you try to pull them. Jerks. Today I discovered some other really nasty ones, though. They look sort of innocent and grassy, but they have lots of very fine, far-reaching roots, so when you pull them, a huge clod of dirt comes up with them. Do not want. 


Sunday, August 11, 2013

The Grass is Always Greener in Somebody Else's Yard

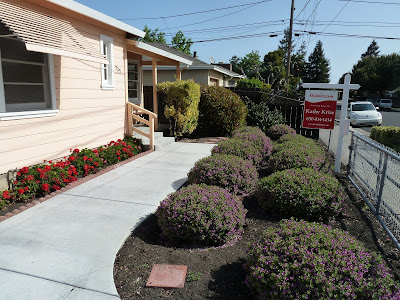
So, the front yard. We're not really into the golf-course perfect lawn thing (good thing, as you'll see below), but we couldn't decide on much else to do with our small front yard besides plant grass. So over many (too many) months, we've been slowly transforming an oddly orderly group of bushes into something that resembles a yard. Sorta. This is the long-overdue post of our attempt. 

It used to look like this:


That's two million of the same purple bush. They really liked it here, so they got really overgrown. We finally decided we were sick of looking at them. Mature bushes like this would cost some actual money at a nursery, so we thought we were being rather generous when we posted on Craigslist and Freecycle that the plants were free to anyone who would come dig them up.

Oy. Nobody showed up when they said they would. Everybody wanted to tell you their life story related to why they didn't just show up when they said they would. People said they were too hard to dig up. People (repeatedly) asked us to dig them up for them. No. 

I think we successfully gave away 4 out of 12. The rest we dug up ourselves and put in the compost bin a couple a week. 

So, clean slate! Weedy slate, but clean slate. 


We decided to avoid dumping a truckload of round up on the yard, and we attempted a greener and uglier method weed killing. We got a couple of rolls of black plastic and hauled out some of the random paving stones we've found around the place. We left this lovely installation in place for a few weeks. 


When we pulled up the plastic, everything was dead. Hooray! Off we went to Home Depot to rent a tiller. After we out-smarted that pesky switch that opens the fuel line, we tilled away. 


Then, because even fancy grass needs water, we installed an irrigation system. Our knowledge of irrigation is pretty much like our knowledge of any of this other house nonsense - we read about it on the internet. Well, Devon read about it on the internet. I helped, because I really love PVC cement. Also, I love those handy ratcheting PVC scissors. (They're probably not actually called scissors.)

I am useful in the autocad stage of each project! Here's our diagram of where we needed to install sprinkler heads to cover the space. 


Digging trenches is no fun, but luckily the yard is small. Here is it tilled and trenched.  


We test-fit the whole system, and I think we only had to go to the hardware store once for additional T's and elbows and such. That's practically miraculous! Here's one of the sprinkler head locations.


The water connection is by the house, across the sidewalk from the yard. Devon found this handy nozzle thinger that you're supposed to use to drill under sidewalks. You attached it to a length of PVC and attach an adapter and garden hose to the other end. It's supposed to spray a strong enough jet of water that with a little muscle you can push the pipe under a sidewalk.


Seems like it should work, no? Yeah, it doesn't. At least, it doesn't work when your soil has so much clay that you could make pottery. One more trip to the hardware store, this time for a steel pipe and a sledge hammer. Here's Devon employing the improved brute force sidewalk drilling technique.


 Once we were through to the other side, we needed to hook the system up to the water supply. I happily cut and glued connectors and such for the pump:


And Devon was in charge of teflon-taping our new and improved hose and sprinkler valves:


Here's the whole mess assembled. The stub to the right is for a future additional irrigation zone to serve the landscaping. Eventually those geraniums will go away (I despise geraniums) and maybe we'll plant something to disguise this set-up a little.


  We cemented the whole system together. Doesn't it almost look like we knew what we were doing?


 We put the heads on and look! Water!


Fast forward to the next weekend - time to plant the grass. We ordered Buffalo Grass, which looks pretty and is fairly drought tolerant once established. You can't just spread seeds, though - you have to plant these little plugs 12"-18" on center. Here are two of the trays. We used three for the whole yard.


And here's the yard all planted! It was a pain, but we were once again glad that the space isn't that big. I got a horrible lower-back sunburn from leaning over for hours. You just don't think to put sunscreen there...

We also planted our lemon tree, which has lived in a big pot for a couple of years now.


 The fruits of our labor - brand new grass being watered!


Here's the yard about one month later. The grass is growing well... just not as well as the weeds.  This is when we realized that we should have actually followed the nursery's instructions for preparing the soil.


We read about what kinds of weed-killers are safe for buffalo grass, and here's the yard as of yesterday. The dead things are weeds! So, it's not beautiful yet, but we're getting there.


And now for something prettier, here are some photos of our other flowers and plants.

Monday, April 15, 2013

Sometimes, pay a guy to overdo it for you

Thursday night, 10:30pm: We hear a weird noise from the garage, look at each other, and reluctantly investigate. 

Things homeowners hate: weird noises, especially at bedtime. 

So, the water heater that we always knew would die soon choose to die (rust through) on Thursday night. The valve at the water heater didn't work, so we had to turn the water off to the whole house. I'm sure these types of things ONLY happen at inconvenient times, but this seemed extra inconvenient. Devon was scheduled to spend 11 hours of his Friday taking the PE exam, and since he works closer to home and has a more flexible schedule, he's usually the one to deal with house stuff that has to happen during business hours. 

Friday I scheduled a plumber and went to work for a half day. Since I hadn't showered, my coworkers probably weren't too sad that I went home early! We wanted to look into a fancy tankless water heater, but the price tag was something like $4,000 - $6,000 after the dedicated gas line and new vent. Ouch. 

The plumber put a new valve in for us (ball valves all the way!) on Friday evening and scheduled a time to come Saturday morning and replace the water heater. We showered at Devon's office and went out for a fancy belated birthday dinner. 

Saturday the plumber worked on the new water heater while we dug up some ugly plants (more on that later). 

Before we moved in:

And now, our slightly larger, much newer and nicer water heater:


The moral of the story is that sometimes you should give up your DIY ambitions and pay the nice plumber to do it for you. Your friends and neighbors will thank you, since this is a much quicker way to get a hot shower. 


Sunday, March 17, 2013

Workbench Planning and Demo

Two posts in two days?! Don't get used to it!

While we're on the subject of the garage, I thought I'd share our next project. The garage had a small workbench, but it didn't have much in the way of storage and it was generally not that great. You can see it over in the corner under the pile of valuable stuff that was left here.


We spent an exciting Friday evening planning out how we wanted to build the new bench and designing it in AutoCad. Life as a homeowner is exciting!


We need to rent a truck to haul away the debris from the old workbench then buy materials for the new one. Yesterday we decided to spend the afternoon on the demolition portion of the project.

Prepare yourself for the cluttered horror that is our garage:


This is after 15 minutes of cleaning, too! Oh, and the contraption to the right is Devon's brew rig. You should help me peer pressure him into blogging about it.

Here's the old workbench after the junk has been cleaned up. Devon is considering mysteries of the universe.


We're going to build the new workbench out from the bare studs, so the awful wood paneling needed to go, for everybody's benefit. Underneath, we found this:


It's Stalwart Sheathing (also called Celotex, I believe), stapled together. There was some kind of masking tape on top of that. So, we decided that this stuff too must go, and started ripping. It all came down pretty easily, since it was held up by staples, small nails, and force of habit.


Inside the wall, we found treasures both living and dead! Living: some cool orange "organic growth". Dead: some kind of bug or bug shell.


We vacuumed up the dead bugs and carried on. The old workbench was surprisingly sturdy, but we won the battle. I think we're going to keep the top boards around for a later project - they're 2x10 redwood and just need to be trimmed and stripped.

Here's the corner where the workbench used to be. We're trying to pretend that that corner of the garage isn't visibly lower than the rest.


And the whole wall:


As you can see the inside face of the siding is water stained. Someone in the past ripped the building paper from between the studs. (Seriously, past home "improver"?) The REAL fix is probably to reside the house and do it right, but since that's not going to happen right now, we might just clean and paint and leave the siding/studs exposed. There's no requirement for sheathing on that wall, and no real need to insulate.

Stay tuned for another post about the fate of that wall and the new workbench!

Saturday, March 16, 2013

A New Garage Door

For the first time since 1989 (best as we can figure), our house has a functional garage door! We have so much stuff in there that we will likely never put a car in the garage, but it's SO nice to have outdoor access for big stuff and the ability to vent the space while working/brewing in the garage.

When we moved it, it looked like this:


It LOOKS like a door, but it's a lie. On the inside, it looked like this:


It was covered over with paneling, which was secured with tape and 2,000 tiny obnoxious nails.

Step 1 was to rip down the paneling. The door itself was, naturally, super gross.


One side of the door hadn't had a working spring in some time, so that was pretty easy to take apart. The spring on the other side was still engaged, so we really took our time and made sure not to kill ourselves with a rouge spring. Success! The spring hardware was apparently meant to stay put for the long haul:


After much cursing (as with most projects around here), we removed the spring hardware and all of the random bits of wood holding the door in place. It was sometime during this process that we found some newspapers shoved next to the door (weatherproofing, obviously). The oldest one was from 1989, so we assume that the door hasn't moved since at LEAST then.


It dawned on us that we had to make some really substantial progress before we were allowed to go to bed. If we still wanted the contents of our garage to be there in the morning, that is.


I'm going to spare you most of the painful details of the new door installation, for your own good. The short story is that we should have thrown the directions out the window before we even started, because not one single thing worked per the instructions. Our house is old, nothing is square or level, and garage door installation instructions are terrible. I guess this is why normal people pay a guy to install a new garage door?

Here is Devon working on the first panel. If we had this to do over again, or if I could give you a piece of marital advice for your own garage door installation, I'd say this: buy his and hers ratcheting wrenches in the right size. There's so much stuff to attach to the door panels, and it's an enormous pain without the right tools.


It was sort of like building a fort once we got going.


But as these things always go, as soon as we got the rhythm down, we ran into a huge problem. We got a reminder of the fact that nothing is level or square. As we stacked the panels, we could no longer connect them to one another because the whole door frame was so out of whack.

The diagonal pencil line is where we needed to chisel to to make the frame vertical. Sooo we bought a nice set of wood chisels! We wouldn't have any fun tools at all if nothing ever went wrong.


I'm fairly sure that we had to remove the first two panels and start over after the chiseling, but I've sort of blocked it out, to be honest.

By the end of the day, we finished our fort. We didn't even get started on the tracks, but at least we didn't have a giant hole in the house.


We had to shim one side of the door up a whole bunch in order to approximate level.


Day 2: Time to install the track. The attachment brackets didn't work for our set-up at all, so there was MUCH cursing and voiding of the warranty. Here's Devon installing our own special version of the attachment hardware.


This was my view from the loft. One thing that I must admit worked amazingly well was the level of the rails. We were able to attach them directly to the floor of the loft.


This brings us to the photo I posted awhile ago as a pop quiz:


It's hard to see, but the door was hitting the spring mounting bracket when raised. We used your standard brute force repair:


It works! We actually kind of hate the lock that came with the door, but we haven't gotten around to finding a new/better one.


An embarrassing number of weeks after the door was functionally complete, we finally removed the temporary trim (needed to prop the door against before the tracks are installed) and put proper trim, weather stripping, and fresh paint on the exterior.


All done! This was kind of a big project, but very worthwhile. We actually don't think a garage door installer with half a brain would have touched it, so it's probably just as well that we stubbornly did it ourselves.

Today we started on our next garage project, which is what finally prompted me to write this post. Maybe I'll post about this new project in a more timely manner! Maybe...